Tutorial
Graphix-ibmq provides a interface to run MBQC pattern (graphix.Pattern) on IBM quantum devices as well as the Aer simulators.
In this tutorial, we look at how to convert MBQC pattern into Qiskit circuit and run that circuit on IBM quantum device using graphix-ibmq library.
We will explain the basics here along with the code, and you can go to Module reference for module references.
Installation
First, install graphix-ibmq by
>>> pip install graphix-ibmq
If you have not installed graphix, also install it by
>>> pip install graphix
Generating MBQC pattern
We first generate a MBQC pattern using graphix library.
We use the 2-qubit QFT as an example.
First, let us import relevant modules and define function we will use:
from graphix import Circuit
from graphix_ibmq.runner import IBMQBackend
import qiskit.quantum_info as qi
from qiskit.visualization import plot_histogram
import numpy as np
import matplotlib.pyplot as plt
import networkx as nx
from qiskit_ibm_provider import IBMProvider


#define the functions required for QFT
def cp(circuit, theta, control, target):
    """Controlled phase gate, decomposed
    """
    circuit.rz(control, theta / 2)
    circuit.rz(target, theta / 2)
    circuit.cnot(control, target)
    circuit.rz(target, -1 * theta / 2)
    circuit.cnot(control, target)

def swap(circuit, a, b):
    """swap gate, decomposed
    """
    circuit.cnot(a, b)
    circuit.cnot(b, a)
    circuit.cnot(a, b)

def qft_rotations(circuit, n):
    """h and cp gates for each qubit
    """
    if n == circuit.width:
        return circuit
    circuit.h(n)
    for qubit in range(n+1, circuit.width):
        cp(circuit, np.pi / 2 ** (qubit - n), qubit, n)

def swap_registers(circuit, n):
    """swap qubits for the output
    """
    for qubit in range(n // 2):
        swap(circuit, qubit, n - qubit - 1)
    return circuit

def qft(circuit, n):
    """generate QFT circuit
    """
    for i in range(n):
        qft_rotations(circuit, i)
    swap_registers(circuit, n)
Then we define a circuit to apply QFT to two-qubit state.
# generate the 2-qubit QFT pattern
n = 2
circuit = Circuit(n)
qft(circuit, n)
pattern = circuit.transpile()

#plot the pattern
nodes, edges = pattern.get_graph()
g = nx.Graph()
g.add_nodes_from(nodes)
g.add_edges_from(edges)
np.random.seed(100)
nx.draw(g)
plt.show()

Pattern-to-circuit conversion
Now let us convert the pattern to qiskit circuit.
# minimize the space of pattern
# see https://graphix.readthedocs.io/en/latest/tutorial.html#minimizing-space-of-a-pattern
pattern.minimize_space()

# convert to qiskit circuit
backend = IBMQBackend(pattern)
backend.to_qiskit()
print(type(backend.circ))

#set the rondom input state
psi = []
for i in range(n):
    psi.append(qi.random_statevector(2, seed=100+i))
backend.set_input(psi)
<class 'qiskit.circuit.quantumcircuit.QuantumCircuit'>
Running pattern on IBM quantum device
Get the API token and load the IBMQ acount.
# load the account with API token
#IBMProvider.save_account(token='MY API TOKEN')

# get the device backend
instance_name = 'your/instance/name'
backend_name = "ibm_hanoi"
backend.get_backend(instance=instance_name,resource=backend_name)
Using backend ibm_hanoi
result = backend.run()
Your job's id: "Job ID"
# Retrieve the job if needed
# result = backend.retrieve_result("Job ID")
We can simulate the circuit with noise model based on the device we used
# get the noise model of the device backend
from qiskit.providers.fake_provider import FakeHanoi
backend_noisemodel = FakeHanoi()
# execute noisy simulation and get counts
result_noise = backend.simulate(noise_model=backend_noisemodel)
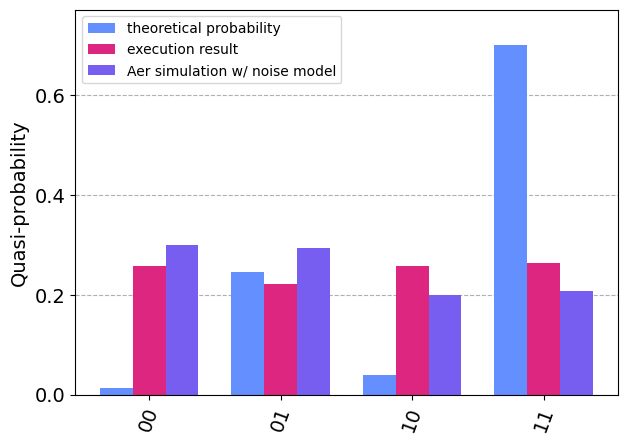
Now let us compare the results with theoretical prediction
# calculate the predicted results
def to_binary(i, n):
    return format(i, '0' + str(n) + 'b')

def state_tensor_prod(psi):
    n = len(psi)
    state = [1]*2**n
    for i in range(2**n):
        i_str = to_binary(i, n)
        for j in range(n):
            state[i] *= psi[j][int(i_str[j])]
    return state

state = state_tensor_prod(psi)

# rescale the amplitudes to compare with sampling results
count_theory = {}
for i in range(len(state)):
    count_theory[f"{i:02b}"] = 1024*np.abs(state[i])**2

# plot and compare the results
fig, ax = plt.subplots(figsize=(7,5))
plot_histogram(
    [count_theory, result, result_noise],
    legend=["theoretical probability", "execution result", "Aer simulation w/ noise model"],
    ax=ax,
    bar_labels=False
)
legend = ax.legend(fontsize=18)
legend = ax.legend(loc='upper left')